
SSH tunneling establishes a secure communication channel between a local work node and a remote server. Let's figure out how you can create SSH tunnels, what functions they have useful for the system administrator, and why it is important to remember about the security of the Internet connection.
Any important data should be transmitted over secure information channels. But this is not always easy to implement, especially when the user needs to perform urgent operations on a remote server, and it is possible to connect to the Internet only through public unprotected Wi-Fi. In this case, SSH tunneling is used, which establishes a secure communication channel between the local working node and the remote server. With it, you can not only transfer or edit files remotely, but also run GUI applications, make backups, transfer passwords, and even organize streaming.
How SSH Tunnels Work
Creation, conditions of use and benefits for sysadmins
The situation when urgent access to a home computer or internal corporate network is required is familiar to everyone. Unfortunately, the quality and security of public networks is often poor. It is better not to transmit important information over such networks. In addition, external software (Team Viewer and others) is often required to organize access. For system administration, there is a way to use public networks and at the same time create a secure connection to the necessary nodes without using the same VPN. It's about SSH tunneling.
SSH (from the English Secure Shell) is a network protocol that is used to remotely control the OS and proxy TCP connections. Encrypts all traffic (this also includes passwords and other data important to corporate security). SSH servers work with most network operating systems on the market.
You can connect using this protocol to almost any server. To organize a secure connection, you can use the so-called SSH tunnels. But in terms of terminology, these are not the tunnels that are usually discussed when talking about system administration. The name itself, SSH tunnel, was formed among sysadmins for simplicity of designating the technology - SSH Port Forwarding (port forwarding). It implements several features of the SSH network protocol at once, namely, the transmission of TCP packets and the translation of the IP header during the transmission of information, provided that a predefined rule exists.
The main difference between SSH tunnels and their VPN counterparts is that information is not transmitted in any direction. Such a communication channel has one entry point and works exclusively with TCP packets. SSH tunneling is more like port forwarding over protocol than pure tunneling.
How to create an SSH tunnel and configure its parameters
In order to identify a user, two keys are required. The public key is hosted directly on the server, while the private key is generated and stored on the user's computer.
It takes a few minutes to generate a key and establish a connection with a remote server.
Create SSH key on Linux (Ubuntu) / MacOS. Step-by-step instruction:
1. To create a key, enter the following command:
Code:
ssh-keygen -t rsa
2. After entering the command, a dialog will appear on the control console screen:
Enter file in which to save the key (/home/user/.ssh/id_rsa):
3. To further protect the connection, the system will prompt the user to come up with and enter a special code word (phrase).
Enter passphrase (empty for no passphrase):
4. Of course, point number 3 can be skipped by pressing Enter. The same should be done when answering the next question.
5. After completing the creation of two types of keys (public and private), you can proceed to establishing communication via SSH. A message will appear on the console:
Code:
Your identification has been saved in /home/user/.ssh/id_rsa.
Your public key has been saved in /home/user/.ssh/id_rsa.pub.
The key fingerprint is:
476:b2:a8:7f:08:b4:c0:af:81:25:7e:21:48:01:0e:98 user@localhost
The key's randomart image is:
+---[RSA 2048]----+
| ..o o |
| .. * * = . |
| . o O o B .|
| . . + = = o |
| oo S o = . .|
| .. B . = . . |
| . B o = ..|
| . .o.o.. o .. .|
| .oooE o. |
+----[SHA256]-----+
6. At the next stage in the terminal, you must enter a command that will show the public key:
Code:
cat ~/.ssh/id_rsa.pub
7. The public key must be entered in the control panel. Carefully check the correctness of the key entry.
8. The last stage remains. To create an SSH tunnel to a remote server, just run one command:
Code:
ssh root@HOST
The HOST parameter is the public IP address of the server.
We add that the introduction of additional passwords is not required. And when using the Selectel server, you can use your own script (bash) for quick configuration.
For the convenience of Windows 10 users, you can create an SSH tunnel in the emulator for Windows (MinGW64).
The instructions for creating an SSH tunnel in Windows 10 look similarly:
1. To generate a pair of keys, use the command:
Code:
ssh-keygen -t rsa
2. It is advisable to protect the private key with a password (or press Enter , if it is not needed):
3. Keys are generated:
4. The public key is stored in the ~ / .ssh / id_rsa.pub file . The private key is located in the id_rsa file and must be kept secret:
5. To view the contents of the public key, use the command:
Code:
cat ~/.ssh/id_rsa.pub
6. This key (the entire line starting with ssh-rsa) must be inserted in the Selectel control panel, in the Operating system / SSH key field of the selected server. When installing the OS, it will be copied to the .ssh / authorized_keys file. When you change the key in the Selectel control panel, the current OS image will be recreated, and the data on the server will be lost.

7. To connect to the server via SSH use the command:
Code:
ssh [email protected] (server IP will be different).
8. The first time you connect, SSH reports an unknown host and asks if you are sure you trust it. If the answer is yes (answer yes ), the IP address and public certificate of this server will be added to the ~ / .ssh / known_hosts file on the local machine:
9. If a password was previously set when generating a key pair, the SSH utility will ask you to enter it:
10. After entering the password and pressing Enter, an encrypted connection to the server is established:
You can read more about creating SSH tunnels in the Knowledge Base.
Another option for how you can use this type of connection is to create a communication channel using the RDP protocol. This option is suitable when the user cannot connect to the site due to the lack of access to it from the network. But he has access to the router. This is enough to use this type of tunneling.
The communication channel parameters are set by the connection initiator. The target server is always located at the other end of the communication channel. So, the client can be a VPS server, and the exit point is the sysadmin's computer. The entry point can be created on either side of the tunnel: it is through it that connections are accepted. The reverse side of the tunnel - the exit point - is only capable of routing packets of information, taking into account the established rules. A separate option is to connect to a remote machine running the Docker module (SSH Docker). We will tell you more about this in the following publications.
The process of establishing a connection with a specific server proceeds in a similar way. Let's take the target server with the address 192.168.0.105 as an example. In this case, only the router (192.168.0.1) is available to the user. 127.0.0.1:3389 is registered as the entry point. In addition, a translation rule is set, which determines the host that receives data at the exit from the SSH tunnel. In our case, 192.168.0.105:3389 is specified as the rule. Make sure that the specified address actually exists, otherwise you will not be able to connect to the target server.
After you set the initial data, a TCP socket appears, which the SSH service creates. This local socket keeps track of when connections to port 3389 begin. The destination is localhost (127.0.0.1). Note that the RDP client has no knowledge of the real destination of the recipient of the packet. The client only opens a dynamic port to send a data packet that has a destination (entry point) and source (127.0.0.1:61256) address.
The packet with information follows from the entry point of the SSH tunnel to its opposite end. The broadcast address will change. Now it says 192.168.0.105:3389. In the next step, the SSH server will simply put its own address instead of the source address. All information that is transmitted within the channel will be sent over the protocol. And the RDP client operates exclusively on a local socket. It is important that all information inside the tunnel is protected - it is encrypted. But the connection between the SSH and RDP servers remains normal. Of course, this factor should be taken into account if the user works with insecure protocols.
SSH Proxy: how to organize access to any system (access to the proxied server)
With an SSH tunnel, you can use your home (or corporate) network, even with unreliable free Wi-Fi. To do this, the user will need to launch an SSH proxy, and then, using a similar principle, create a tunnel to the target network (for example, you can connect to your home network).
It is important that the applications required by the initiator of the connection to work support SOCKS proxies. The tunnel will make network services available for remote work. Another option: the user will be able to access the Internet using a home connection, but while sitting on the other side of the world and using a public network. All information transmitted through the tunnel will be encrypted.
This is not the only practical way to use SSH tunneling. One of the most popular cases - SSH Proxy - opens access to the desired system if it is available to a remote server. At the same time, to tunnel through a proxy server, you need to enter only one command:
Code:
localhost:~$ ssh -D 8888 user@remoteserver
localhost:~$ netstat -pan | grep 8888
tcp 0 0 127.0.0.1:8888 0.0.0.0:* LISTEN 23880/ssh
The command above shows that the user is running a SOCKS proxy. The port for operation is 8888. In addition, it is necessary to check if this TCP port is active (listening mode is used). The service runs exclusively on localhost (127.0.0.1). If you modify the command a little, then you can listen on all interfaces (including ethernet or Wi-Fi). This allows applications to connect to the proxy through an SSH proxy:
Code:
localhost:~$ ssh -D 0.0.0.0:8888 user@remoteserver
For the browser to work correctly, settings are required. For example, to start Chrome with SOCKS proxy enabled, you need the command:
Code:
localhost:~$ google-chrome --proxy-server="socks5://192.168.1.10:8888"
It creates SOCKS proxies and also initiates tunneling of DNS requests. The tcpdump utility checks whether DNS queries are visible or not.
In addition to browsers, many modern applications work with SOCKS proxies: you just need to change their parameters to activate the proxy server. Separately, tools are used that help applications use this important function - for example, proxychains allows you to run Microsoft RDP through a SOCKS proxy.
Why dynamic SSH tunnels are needed
The dynamic SSH tunnel is different from the connection types discussed above. It opens a local TCP socket for use as a SOCKS4 / SOCKS5 proxy. It is typically used when a VPN is required and cannot be deployed. This type of SSH tunnel also meets the necessary security requirements.
In addition, creating a dynamic tunnel is convenient when a user needs to access the Internet once:
Code:
ssh -D 1080 [email protected]
SOCKS proxy works on port 1080.
In addition, the dynamic tunnel does not provide for the opening of additional ports to the external network. All traffic will go exclusively through the SSH connection, thereby obscuring the nature of the user's Internet activity.
SSH Tunnel Commands and Practical Applications
Let's look at some practical examples of using SSH tunneling.
Forwarding (forwarding) ports - Port Forwarding
To perform port forwarding, you will need to create an SSH tunnel. To do this, a port is opened on the local system, and to create a communication channel, the user must select a port on the other end of the tunnel:
Code:
localhost:~$ ssh -L 9999:127.0.0.1:80 user@remoteserver
The command sets a wiretap on port 9999. Port 80 is used for forwarding. Port Forwarding also uses proxies or TCP services.
Public (public) key copying automation
Traditionally, the user has to copy the public keys manually. SSH protocol significantly speeds up this process:
Code:
localhost:~$ ssh-copy-id user@remoteserver
This command copies the default public key or from the ~ / .ssh / id_rsa.pub directory to ~ / .ssh / authorized_keys (located on the remote server).
SSH reverse tunnel
Obviously, an SSH tunnel can be created in the opposite direction. It is enough to connect the listening port to another local port:
Code:
localhost:~$ ssh -v -R 0.0.0.0:1999:127.0.0.1:902 192.168.1.100 user@remoteserver
This tunnel works as follows: from port 1999 to remoteserver, and after that it accesses port 902 on the local client.
Remote command execution using SSH
The SSH command allows you to create an interface for working with commands on a remote host. They are written as the last parameter:
Code:
localhost:~$ ssh remoteserver "cat /var/log/nginx/access.log" | grep badstuff.php
After downloading the log, grep can be run on the remote side.
Copy, rsync copy function (rsync over SSH)
To create a duplicate folder on a remote server, you just need to compress the folder using bzip2, and then extract the bzip2 stream on the other side. The command for this operation is as follows:
Code:
localhost:~$ tar -cvj /datafolder | ssh remoteserver "tar -xj -C /datafolder"
For regular backups of important information, rsync is used:
Code:
localhost:~$ rsync -az /home/testuser/data proglibserver:backup/
The rsync function allows you to copy differences by comparing information at different time points. In this way, important data can be recovered in the event of a failed transfer.
GUI applications: remote launch via SSH
SSH tunnel supports a feature that allows you to run GUI applications remotely:
Code:
localhost:~$ ssh -X remoteserver vmware
Note that even though the GUI is running on a remote server, the window is displayed on the local desktop. In the example, the console of the VMware Workstation virtual machine is launched to work. But the command requires the X11 and YES packages for X11Forwarding in the sshd_config file to successfully implement the command.
Editing text files
The method of editing files with one command involves creating a file in / tmp, and then copying it to the specified directory:
Code:
localhost:~$ vim scp://user@remoteserver//etc/hosts
Code:
Jumping by hosts
Tunneling involves going through multiple hosts if the user is faced with network segmentation:
Code:
localhost:~$ ssh -J host1,host2,host3 [email protected]
The -J option uses redirection to establish a session with each subsequent host in the chain. In this case, the working session is fully encrypted - from localhost to host4.
Filtering traffic with iptables
The iptables utility allows you to set rules for blocking or allowing traffic: INPUT, FORWARD and OUTPUT. If the user has not specified any rules, this firewall will perform the default filtering. To establish a connection with the target server, the utility will compare the IP address of the initiator of the connection with the list that is in the INPUT rules, and then either give access to the server or deny it.
However, working with iptables requires some caution. The reason is simple: if the filtering rule is set incorrectly, remote access may simply be impossible until the user removes the restrictions by gaining physical access to the computer.
Implementing SSH tunnels on Windows
Tunneling capabilities are also available for those using Windows 10: there are a number of SSH clients for this OS. One of the most used is PuTTY. Running a server under Windows is a more complex task that requires specialized skills from the user.
PuTTY is configured quite simply: for this, in the Connection tab, open SSH Tunnels, where you need to register the basic connection settings - Source port (entry point), Destination (destination); radio switches Local - Remote - Dynamic determine the type of the future communication channel. The target node address is specified in another section - Session.
There is no need to open additional ports or deploy VPN.
Are SSH tunnels secure?
As we have already noted, one of their tasks is to create a secure connection with a remote machine. However, do not forget about the "side effects" of such tunnels. In addition to connecting to a remote server, the user receives a console that opens on the server.
If the user forgets about his connection, he can execute the commands that were originally intended to be executed on the local node. To avoid such an error (especially if the user has superuser rights), you should specify the -N parameter when starting the communication channel:
Code:
ssh -N -L -g 3389:192.168.0.105:3389 [email protected]
In addition, you should not use a superuser account when connecting to a remote machine; an account with normal rights is suitable for this purpose. And do not forget about the fact that upon completion of the work, you need to delete the SSH tunnel.
Any important data should be transmitted over secure information channels. But this is not always easy to implement, especially when the user needs to perform urgent operations on a remote server, and it is possible to connect to the Internet only through public unprotected Wi-Fi. In this case, SSH tunneling is used, which establishes a secure communication channel between the local working node and the remote server. With it, you can not only transfer or edit files remotely, but also run GUI applications, make backups, transfer passwords, and even organize streaming.
How SSH Tunnels Work
Creation, conditions of use and benefits for sysadmins
The situation when urgent access to a home computer or internal corporate network is required is familiar to everyone. Unfortunately, the quality and security of public networks is often poor. It is better not to transmit important information over such networks. In addition, external software (Team Viewer and others) is often required to organize access. For system administration, there is a way to use public networks and at the same time create a secure connection to the necessary nodes without using the same VPN. It's about SSH tunneling.
SSH (from the English Secure Shell) is a network protocol that is used to remotely control the OS and proxy TCP connections. Encrypts all traffic (this also includes passwords and other data important to corporate security). SSH servers work with most network operating systems on the market.
You can connect using this protocol to almost any server. To organize a secure connection, you can use the so-called SSH tunnels. But in terms of terminology, these are not the tunnels that are usually discussed when talking about system administration. The name itself, SSH tunnel, was formed among sysadmins for simplicity of designating the technology - SSH Port Forwarding (port forwarding). It implements several features of the SSH network protocol at once, namely, the transmission of TCP packets and the translation of the IP header during the transmission of information, provided that a predefined rule exists.
The main difference between SSH tunnels and their VPN counterparts is that information is not transmitted in any direction. Such a communication channel has one entry point and works exclusively with TCP packets. SSH tunneling is more like port forwarding over protocol than pure tunneling.
How to create an SSH tunnel and configure its parameters
In order to identify a user, two keys are required. The public key is hosted directly on the server, while the private key is generated and stored on the user's computer.
It takes a few minutes to generate a key and establish a connection with a remote server.
Create SSH key on Linux (Ubuntu) / MacOS. Step-by-step instruction:
1. To create a key, enter the following command:
Code:
ssh-keygen -t rsa
2. After entering the command, a dialog will appear on the control console screen:
Enter file in which to save the key (/home/user/.ssh/id_rsa):
3. To further protect the connection, the system will prompt the user to come up with and enter a special code word (phrase).
Enter passphrase (empty for no passphrase):
4. Of course, point number 3 can be skipped by pressing Enter. The same should be done when answering the next question.
5. After completing the creation of two types of keys (public and private), you can proceed to establishing communication via SSH. A message will appear on the console:
Code:
Your identification has been saved in /home/user/.ssh/id_rsa.
Your public key has been saved in /home/user/.ssh/id_rsa.pub.
The key fingerprint is:
476:b2:a8:7f:08:b4:c0:af:81:25:7e:21:48:01:0e:98 user@localhost
The key's randomart image is:
+---[RSA 2048]----+
| ..o o |
| .. * * = . |
| . o O o B .|
| . . + = = o |
| oo S o = . .|
| .. B . = . . |
| . B o = ..|
| . .o.o.. o .. .|
| .oooE o. |
+----[SHA256]-----+
6. At the next stage in the terminal, you must enter a command that will show the public key:
Code:
cat ~/.ssh/id_rsa.pub
7. The public key must be entered in the control panel. Carefully check the correctness of the key entry.
8. The last stage remains. To create an SSH tunnel to a remote server, just run one command:
Code:
ssh root@HOST
The HOST parameter is the public IP address of the server.
We add that the introduction of additional passwords is not required. And when using the Selectel server, you can use your own script (bash) for quick configuration.
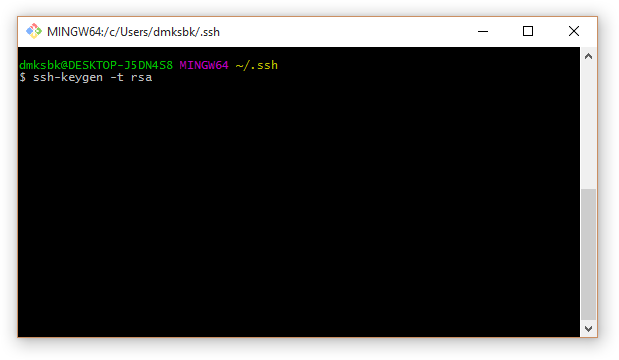
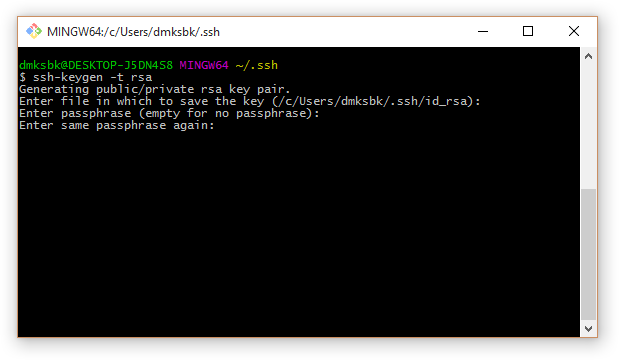
For the convenience of Windows 10 users, you can create an SSH tunnel in the emulator for Windows (MinGW64).
The instructions for creating an SSH tunnel in Windows 10 look similarly:
1. To generate a pair of keys, use the command:
Code:
ssh-keygen -t rsa
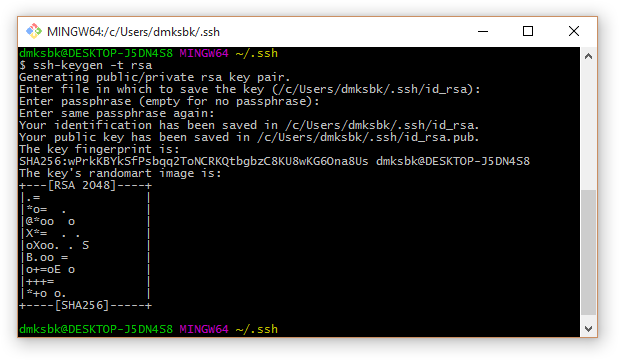
2. It is advisable to protect the private key with a password (or press Enter , if it is not needed):
3. Keys are generated:
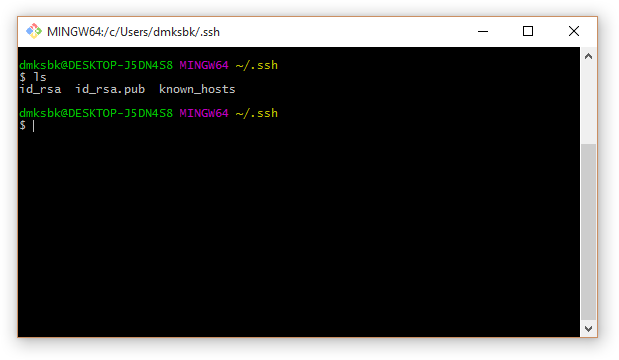
4. The public key is stored in the ~ / .ssh / id_rsa.pub file . The private key is located in the id_rsa file and must be kept secret:
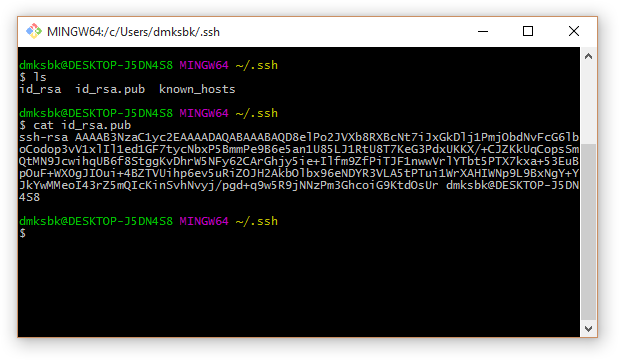
5. To view the contents of the public key, use the command:
Code:
cat ~/.ssh/id_rsa.pub
6. This key (the entire line starting with ssh-rsa) must be inserted in the Selectel control panel, in the Operating system / SSH key field of the selected server. When installing the OS, it will be copied to the .ssh / authorized_keys file. When you change the key in the Selectel control panel, the current OS image will be recreated, and the data on the server will be lost.
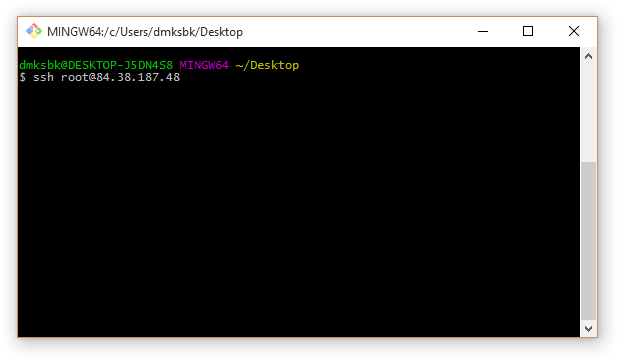
7. To connect to the server via SSH use the command:
Code:
ssh [email protected] (server IP will be different).
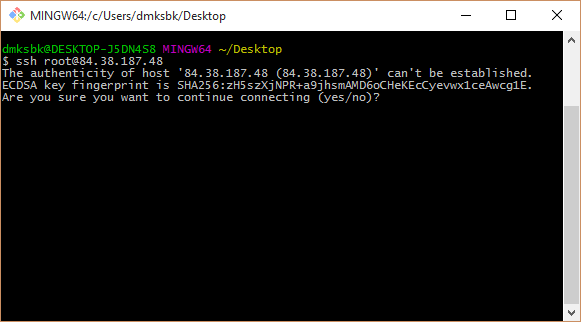
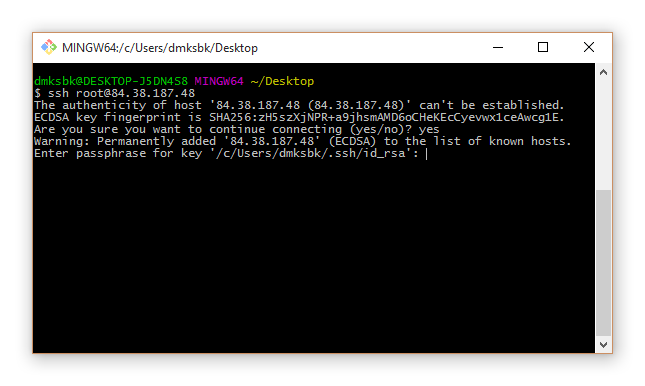
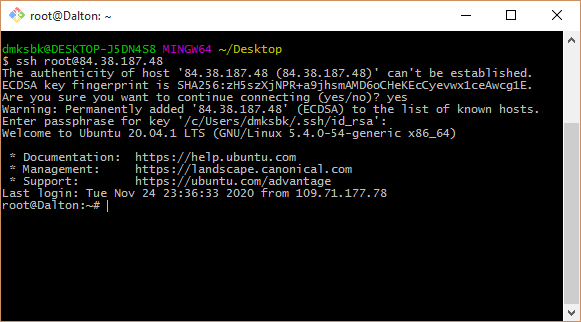
8. The first time you connect, SSH reports an unknown host and asks if you are sure you trust it. If the answer is yes (answer yes ), the IP address and public certificate of this server will be added to the ~ / .ssh / known_hosts file on the local machine:
9. If a password was previously set when generating a key pair, the SSH utility will ask you to enter it:
10. After entering the password and pressing Enter, an encrypted connection to the server is established:
You can read more about creating SSH tunnels in the Knowledge Base.
Another option for how you can use this type of connection is to create a communication channel using the RDP protocol. This option is suitable when the user cannot connect to the site due to the lack of access to it from the network. But he has access to the router. This is enough to use this type of tunneling.
The communication channel parameters are set by the connection initiator. The target server is always located at the other end of the communication channel. So, the client can be a VPS server, and the exit point is the sysadmin's computer. The entry point can be created on either side of the tunnel: it is through it that connections are accepted. The reverse side of the tunnel - the exit point - is only capable of routing packets of information, taking into account the established rules. A separate option is to connect to a remote machine running the Docker module (SSH Docker). We will tell you more about this in the following publications.
The process of establishing a connection with a specific server proceeds in a similar way. Let's take the target server with the address 192.168.0.105 as an example. In this case, only the router (192.168.0.1) is available to the user. 127.0.0.1:3389 is registered as the entry point. In addition, a translation rule is set, which determines the host that receives data at the exit from the SSH tunnel. In our case, 192.168.0.105:3389 is specified as the rule. Make sure that the specified address actually exists, otherwise you will not be able to connect to the target server.
After you set the initial data, a TCP socket appears, which the SSH service creates. This local socket keeps track of when connections to port 3389 begin. The destination is localhost (127.0.0.1). Note that the RDP client has no knowledge of the real destination of the recipient of the packet. The client only opens a dynamic port to send a data packet that has a destination (entry point) and source (127.0.0.1:61256) address.
The packet with information follows from the entry point of the SSH tunnel to its opposite end. The broadcast address will change. Now it says 192.168.0.105:3389. In the next step, the SSH server will simply put its own address instead of the source address. All information that is transmitted within the channel will be sent over the protocol. And the RDP client operates exclusively on a local socket. It is important that all information inside the tunnel is protected - it is encrypted. But the connection between the SSH and RDP servers remains normal. Of course, this factor should be taken into account if the user works with insecure protocols.
SSH Proxy: how to organize access to any system (access to the proxied server)
With an SSH tunnel, you can use your home (or corporate) network, even with unreliable free Wi-Fi. To do this, the user will need to launch an SSH proxy, and then, using a similar principle, create a tunnel to the target network (for example, you can connect to your home network).
It is important that the applications required by the initiator of the connection to work support SOCKS proxies. The tunnel will make network services available for remote work. Another option: the user will be able to access the Internet using a home connection, but while sitting on the other side of the world and using a public network. All information transmitted through the tunnel will be encrypted.
This is not the only practical way to use SSH tunneling. One of the most popular cases - SSH Proxy - opens access to the desired system if it is available to a remote server. At the same time, to tunnel through a proxy server, you need to enter only one command:
Code:
localhost:~$ ssh -D 8888 user@remoteserver
localhost:~$ netstat -pan | grep 8888
tcp 0 0 127.0.0.1:8888 0.0.0.0:* LISTEN 23880/ssh
The command above shows that the user is running a SOCKS proxy. The port for operation is 8888. In addition, it is necessary to check if this TCP port is active (listening mode is used). The service runs exclusively on localhost (127.0.0.1). If you modify the command a little, then you can listen on all interfaces (including ethernet or Wi-Fi). This allows applications to connect to the proxy through an SSH proxy:
Code:
localhost:~$ ssh -D 0.0.0.0:8888 user@remoteserver
For the browser to work correctly, settings are required. For example, to start Chrome with SOCKS proxy enabled, you need the command:
Code:
localhost:~$ google-chrome --proxy-server="socks5://192.168.1.10:8888"
It creates SOCKS proxies and also initiates tunneling of DNS requests. The tcpdump utility checks whether DNS queries are visible or not.
In addition to browsers, many modern applications work with SOCKS proxies: you just need to change their parameters to activate the proxy server. Separately, tools are used that help applications use this important function - for example, proxychains allows you to run Microsoft RDP through a SOCKS proxy.
Why dynamic SSH tunnels are needed
The dynamic SSH tunnel is different from the connection types discussed above. It opens a local TCP socket for use as a SOCKS4 / SOCKS5 proxy. It is typically used when a VPN is required and cannot be deployed. This type of SSH tunnel also meets the necessary security requirements.
In addition, creating a dynamic tunnel is convenient when a user needs to access the Internet once:
Code:
ssh -D 1080 [email protected]
SOCKS proxy works on port 1080.
In addition, the dynamic tunnel does not provide for the opening of additional ports to the external network. All traffic will go exclusively through the SSH connection, thereby obscuring the nature of the user's Internet activity.
SSH Tunnel Commands and Practical Applications
Let's look at some practical examples of using SSH tunneling.
Forwarding (forwarding) ports - Port Forwarding
To perform port forwarding, you will need to create an SSH tunnel. To do this, a port is opened on the local system, and to create a communication channel, the user must select a port on the other end of the tunnel:
Code:
localhost:~$ ssh -L 9999:127.0.0.1:80 user@remoteserver
The command sets a wiretap on port 9999. Port 80 is used for forwarding. Port Forwarding also uses proxies or TCP services.
Public (public) key copying automation
Traditionally, the user has to copy the public keys manually. SSH protocol significantly speeds up this process:
Code:
localhost:~$ ssh-copy-id user@remoteserver
This command copies the default public key or from the ~ / .ssh / id_rsa.pub directory to ~ / .ssh / authorized_keys (located on the remote server).
SSH reverse tunnel
Obviously, an SSH tunnel can be created in the opposite direction. It is enough to connect the listening port to another local port:
Code:
localhost:~$ ssh -v -R 0.0.0.0:1999:127.0.0.1:902 192.168.1.100 user@remoteserver
This tunnel works as follows: from port 1999 to remoteserver, and after that it accesses port 902 on the local client.
Remote command execution using SSH
The SSH command allows you to create an interface for working with commands on a remote host. They are written as the last parameter:
Code:
localhost:~$ ssh remoteserver "cat /var/log/nginx/access.log" | grep badstuff.php
After downloading the log, grep can be run on the remote side.
Copy, rsync copy function (rsync over SSH)
To create a duplicate folder on a remote server, you just need to compress the folder using bzip2, and then extract the bzip2 stream on the other side. The command for this operation is as follows:
Code:
localhost:~$ tar -cvj /datafolder | ssh remoteserver "tar -xj -C /datafolder"
For regular backups of important information, rsync is used:
Code:
localhost:~$ rsync -az /home/testuser/data proglibserver:backup/
The rsync function allows you to copy differences by comparing information at different time points. In this way, important data can be recovered in the event of a failed transfer.
GUI applications: remote launch via SSH
SSH tunnel supports a feature that allows you to run GUI applications remotely:
Code:
localhost:~$ ssh -X remoteserver vmware
Note that even though the GUI is running on a remote server, the window is displayed on the local desktop. In the example, the console of the VMware Workstation virtual machine is launched to work. But the command requires the X11 and YES packages for X11Forwarding in the sshd_config file to successfully implement the command.
Editing text files
The method of editing files with one command involves creating a file in / tmp, and then copying it to the specified directory:
Code:
localhost:~$ vim scp://user@remoteserver//etc/hosts
Code:
Jumping by hosts
Tunneling involves going through multiple hosts if the user is faced with network segmentation:
Code:
localhost:~$ ssh -J host1,host2,host3 [email protected]
The -J option uses redirection to establish a session with each subsequent host in the chain. In this case, the working session is fully encrypted - from localhost to host4.
Filtering traffic with iptables
The iptables utility allows you to set rules for blocking or allowing traffic: INPUT, FORWARD and OUTPUT. If the user has not specified any rules, this firewall will perform the default filtering. To establish a connection with the target server, the utility will compare the IP address of the initiator of the connection with the list that is in the INPUT rules, and then either give access to the server or deny it.
However, working with iptables requires some caution. The reason is simple: if the filtering rule is set incorrectly, remote access may simply be impossible until the user removes the restrictions by gaining physical access to the computer.
Implementing SSH tunnels on Windows
Tunneling capabilities are also available for those using Windows 10: there are a number of SSH clients for this OS. One of the most used is PuTTY. Running a server under Windows is a more complex task that requires specialized skills from the user.
PuTTY is configured quite simply: for this, in the Connection tab, open SSH Tunnels, where you need to register the basic connection settings - Source port (entry point), Destination (destination); radio switches Local - Remote - Dynamic determine the type of the future communication channel. The target node address is specified in another section - Session.
There is no need to open additional ports or deploy VPN.
Are SSH tunnels secure?
As we have already noted, one of their tasks is to create a secure connection with a remote machine. However, do not forget about the "side effects" of such tunnels. In addition to connecting to a remote server, the user receives a console that opens on the server.
If the user forgets about his connection, he can execute the commands that were originally intended to be executed on the local node. To avoid such an error (especially if the user has superuser rights), you should specify the -N parameter when starting the communication channel:
Code:
ssh -N -L -g 3389:192.168.0.105:3389 [email protected]
In addition, you should not use a superuser account when connecting to a remote machine; an account with normal rights is suitable for this purpose. And do not forget about the fact that upon completion of the work, you need to delete the SSH tunnel.